Thursday, May 31, 2007

Miniature Brownie Cups


My miniature muffin pan doesn’t get the love it deserves from me. (Then again, neither does my 15 x 10 x 1-inch pan or my 9-inch springform pan, but those are two other posts altogether.) In an affectionate effort to show him some much-craved love before he gets bubble-wrapped and put into storage next week, I wanted to bake some two-bite treats, and Miniature Brownie Cups seemed to be the perfect recipe to make.

My friend Amy and I finally got together for lunch today at Brio after two previous failed attempts, so I figured that was a good enough reason to bake something. (Isn't there always a good enough reason to bake, though?) After sampling one of these from the first batch, I decided to bake two more batches. One batch for Amy to take back to her office to share with her co-workers, another batch for her to take home to her hubby and son and, well, a batch for me. Boy-oh-boy is Mr. Miniature Muffin Pan finally feeling the love!!! Three times in one day is more action than he's gotten in the six or so years I've owned him.

These brownie cups are really delicious. The texture is somewhere between that of chocolate cake and a crunchy top/chewy middle brownie. The pecans, which toast on top of the brownie cups as they bake, add a nice crunch, too. I think these would be really good using miniature baking M&M's, too.

Yummy and easy to make... my kind of recipe!!!

Miniature Brownie Cups

Source: Old-Fashioned Bake Sale, p. 79

6 tablespoons unsalted butter, melted
¾ cup sugar
½ teaspoon vanilla extract
2 eggs
½ cup all-purpose flour
¼ cup natural or Dutch-processed cocoa powder
¼ teaspoon baking powder
Dash salt
¼ cup finely chopped pecans

Preheat oven to 350 degrees F. Line small muffin cups (1 ¾ inches in diameter) with paper baking cups. Whisk together butter, sugar and vanilla extract in medium bowl. Add eggs, one at a time; beat well.

Sift together flour, cocoa powder, baking powder and salt; gradually add to butter mixture, whisking until well blended. Using a spoon, fill muffin cups ½ full with batter; sprinkle nuts over top.

Bake 12 to 15 minutes or until wooden pick inserted in center comes out almost clean. Cool slightly; remove brownies from pan to wire rack. Cool completely.

Makes about 24 brownies.

 
Posted by Picasa

Tuesday, May 29, 2007

Key Lime Pie with Coconut Graham Cracker Crust

One of my "a few times a week" blog reads is Coconut and Lime. Upon reading last week, I saw that Rachel is celebrating her three year blogiversary so I figured, "What better way to honor Rachel and her blog than to make a Key Lime Pie with Coconut Graham Cracker Crust?" This recipe is my standard key lime pie recipe in which I substituted 1/2 cup of the crushed graham crackers in the crust with 1/2 cup sweetened coconut instead. Also, I sprinkled the top of the pie with toasted coconut and added a slice of lime for some much-needed visual pizazz.

Happy 3rd Blogiversary, Rachel and Coconut and Lime!!!

Since Rachel isn't here in person to enjoy this cool, refreshing pie with me, I enjoyed a big, yummy piece of it along with my friend Kurt. I know that key lime pie just happens to be one of his favorite desserts, and since his birthday is coming up, it was an early treat for him (and also a nice change from a traditional birthday cake). The tart, creamy filling is delicious, and the coconut in the crust and on top really adds a nice texture and flavor, too. Who knew coconut and lime were so good together? (Obviously, Rachel did.)

Key Lime Pie with Coconut Graham Cracker Crust

Crust
1 cup plus 2 tablespoons crushed graham crackers
1/2 cup sweetened coconut
1/2 cup (1 stick) unsalted butter, melted

Filling
1 (8 ounce) package 1/3-less-fat cream cheese, softened
1 (14 ounce) can fat-free sweetened condensed milk
½ cup key lime juice

Topping
3 tablespoons sweetened coconut, toasted and cooled

Preheat oven to 350° F.

In medium bowl, mix crushed graham crackers and coconut together. Add melted butter and mix until well blended. Using the tines of a dinner fork or your fingers, press crust mixture into bottom and up the sides of a 9-inch pie pan. Bake crust until set, about 5-6 minutes. Cool completely on wire rack before filling.

In medium bowl, beat cream cheese and sweetened condensed milk using an electric mixer on medium speed until smooth. Add in key lime juice; stir to combine. Pour filling into crust. Sprinkle top of pie with toasted coconut. Cover pie with plastic wrap and chill at least 12 hours (or until set) before serving.

Makes 8 servings.


A celebratory slice for Rachel:

 
Posted by Picasa

Monday, May 28, 2007

Chicken, Rice, and Black Bean Salad

My friend Kurt is coming over tonight to eat dinner and watch the hockey game with me (our last dinner and hockey game together before he moves to Scottsdale on Wednesday...Boo Hoo!!!), and since it's warm outside and I was looking for something easy to make, I decided to make Chicken, Rice, and Black Bean Salad from an old issue of Everyday Food magazine. It looked like a tastebud-friendly meal that both of us would enjoy, and since I had all of the ingredients on hand, it was a no-brainer to make it.

Since I actually (sort of) planned ahead for dinner tonight, last night I made Key Lime Pie with Coconut Graham Cracker Crust to have afterwards for dessert. (There are two reasons I chose to make a key lime pie. You'll have to wait for the next post.) I'll post a review of both recipes later tonight or tomorrow morning, but I just wanted to get a head start now and post the recipe for our main course (if that's what you want to call it).

Update (as promised): This salad is fantastic and very filling. Kurt's first words after his first bite was, "Damn, this is good." I guess that could sum up my reaction to it, too. I followed the recipe exactly as written. I did leave in the seeds from the jalapeno, and it added a nice kick. I also used a generous 1/2 teaspoon of cumin. I used a few pinches of sea salt and generously grinded fresh black pepper over the salad before tossing it one last time and serving. This recipe makes a LOT of food. (Kurt left tonight with a big plastic container of it, and I cannot wait to eat it again for lunch...and probably dinner...tomorrow.) This would be great to take along to a picnic or BBQ as a different kind of cold salad...you know, not the typical (boring) pasta salad and potato salad you see all the time.

Chicken, Rice, and Black Bean Salad

Source: Everyday Food magazine - June 2005, p. 105

1 cup brown (or white) rice
1 cooked chicken (about 2 ½ pounds), shredded (about 4 cups)
1 can (15.5 ounces) black beans, drained and rinsed
6 plum tomatoes, sliced*
4 scallions, thinly sliced
1 jalapeno chile, minced (seeds and ribs removed for less heat, if desired)
¼ cup white wine vinegar
3 tablespoons olive oil
½ teaspoon ground cumin
Salt and freshly ground pepper, to taste

Cook rice according to package instructions. Spread on a baking sheet; refrigerate until cool.

Place cooled rice in a large bowl; add chicken, beans, tomatoes, scallions, jalapeno, vinegar, oil, and cumin. Season with salt and pepper; toss to combine. Serve immediately, or refrigerate, covered, up to 1 day.

*How to slice plum tomatoes:
Quarter tomatoes lengthwise. Lay quarters skin side down, and slice out seeds. Slice flesh crosswise about ¼ inch thick.

In serving bowl (without flash):


Scooped out into individual bowl (with flash):

 
Posted by Picasa

Sunday, May 27, 2007

Nutella Frosted Cupcakes

When I saw this recipe on Baking Bites, I knew I just had to make it. Actually, I saw this recipe many, many months ago and never got around to making it, but in keeping with the promise I made to my lonesome jar of Nutella to use him up this weekend, I was sold on both the ease of this recipe and the picture. I mean, look at that picture!!! Who wouldn't want to make these???

Nicole's description of "tender, rich and very, very tasty" sums these cupcakes up perfectly. These would be really easy to transport to any kind of get-together like a picnic or BBQ because the frosting is baked in.

These are fantastic. Stop reading this post and go make them. Pronto!!!

Nutella Frosted Cupcakes

Seen on Baking Bites
Adapted from Donna Hay


10 T. unsalted butter, softened
3/4 cup white sugar
3 eggs
1/2 tsp. vanilla extract
1 3/4 cups all-purpose flour
1/4 tsp. salt
2 tsp. baking powder
Nutella, approximately 1/3 cup

Preheat oven to 325 F. Line 12 muffin tins with paper liners. Cream together butter and sugar until light and fluffy, about 2 minutes. Add in eggs, one at a time, until fully incorporated. Don't worry if the batter doesn't look smooth. Add vanilla. Stir in flour, salt and baking powder until batter is uniform and no flour remains. Using an ice cream scoop, fill each muffin liner with batter. They should be 3/4 full, if you're not using a scoop. Top each cake with 1 1/2 tsp. Nutella. Swirl Nutella in with a toothpick, making sure to fold a bit of batter up over the Nutella. Bake for 20 minutes. Remove to a wire rack to cool completely.

Makes 12 cupcakes.


Posted by Picasa

Nutella

I am dedicating all day today to Nutella, so in appreciation of the delicious chocolate hazelnut spread, I am posting two recent pictures of the beloved.

Small jar of Nutella from my dark, American pantry:


HUGE gallon-sized "jugs" of Nutella at a crêperie in Nice, France:

 
Posted by Picasa

Four (or five) ingredients to YUM!!!

My sad little jar of Nutella was begging for me to use him this weekend, and I graciously agreed to grant his holiday weekend wish.

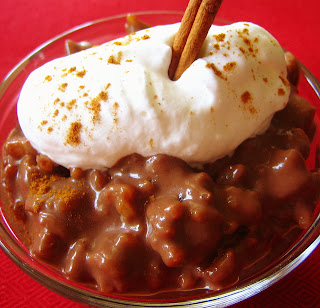
I found this recipe on Recipe Goldmine and decided to tweak it a little. I halved the original recipe and tweaked the ingredient amounts (I added an additional tablespoon of both Nutella and Arborio rice and left out the dried cherries/dried cranberries).

SO simple. SO delicious. It will SO will be repeated again...soon!!!

Nutella Rice Pudding

Adapted from Recipe Goldmine

3 cups 2% milk, divided
1/2 cup plus 1 T. Nutella
1 cinnamon stick (or 1 teaspoon ground cinnamon)
1/2 cup plus 1 tablespoon Arborio rice (do not substitute or pudding will not thicken)

Preheat oven to 325 degrees F. Coat an 8x8-inch glass or metal (not aluminum) pan with vegetable oil spray.

Over medium heat, whisk together 2 cups milk and the Nutella in a heavy-bottom 2-quart saucepan. Add cinnamon stick and bring to a boil. Stir in Arborio rice and transfer to prepared pan. Bake 30 minutes, stirring every 8 to 10 minutes.

Add remaining 1 cup milk, combining well, and bake 15 to 20 minutes longer, stirring every 8 to 10 minutes, or until pudding has thickened and rice is soft. Remove cinnamon stick, if using, and cool 15 to 20 minutes.

Serve warm or cover and refrigerate. (I spooned the pudding into 4 individual ramekins and let them cool to room temperature before covering them with plastic wrap and putting them in the refrigerator overnight to thicken to the consistency I wanted to achieve.)

If desired, sprinkle with cinnamon-dusted whipped cream. (Desire it!!! It really adds a nice finishing touch to the pudding.)

Mindy’s notes: I used a cinnamon stick instead of 1 teaspoon ground cinnamon because I wanted a more subtle cinnamon flavor. Also, make sure you stir this every 8 to 10 minutes to prevent the rice from sticking together and to keep a skin from forming. If you plan to serve this warm, I would add an additional 1-2 tablespoons of Arborio rice so it is a little bit thicker. I refrigerated it overnight and the consistency the next day was perfect, but right out of the oven and after sitting, it was still a bit runny. Adding an additional tablespoon or two of the rice would firm the pudding up to a thicker consistency right out of the oven.

 
Posted by Picasa

Saturday, May 26, 2007

Bon Voyage!!!

I just wanted to say farewell (only temporarily, of course) to my parents who leave for Rome tomorrow. They're going on this cruise next week, and I'm so envious they get to go to Turkey and Croatia (not so envious about Greece, though...well, maybe Santorini). Anyway, I hope you have a wonderful trip, and don't forget to bring me back something personally blessed by the Pope. (Inside joke.)

My brother was nice enough (forced by me) to go dogsit (in their lame small town in Florida) because I had packing to do up here. He may even be so bored (oh, he will be) that he reads my blog for the next two weeks. (Hi, Mike!!!)

Have fun, Mom and Dad!!! I love you lots.

The cute dog (and avid blog reader) who couldn't go on the cruise: (Hi, Mariah!!!)

 
Posted by Picasa

Cucumber Salad with Rice Vinegar Dressing

I made this salad yesterday to eat as a side to the Ham and Manchego Panini with Dipping Sauce. It was really tasty yesterday, but it tastes even better today after sitting overnight in the refrigerator. It's really easy to make, and the light dressing is very flavorful. (I used Boyajian Toasted Sesame Oil.) The green onions and peanuts add even more flavor along with a nice crunch. The Cooking Light description sums it up perfectly: "Peanuts boost the crunch in this cool, refreshing salad, while dark sesame oil deepens the taste."

Cucumber Salad with Rice Vinegar Dressing

Source: Cooking Light, June 2007

3 cups thinly sliced seeded peeled cucumber (about 2 medium)
3 tablespoons rice vinegar
1 teaspoon sugar
2 teaspoons dark sesame oil
1/2 teaspoon salt
2 tablespoons chopped green onions
1 1/2 tablespoons chopped unsalted, dry-roasted peanuts

Combine first 5 ingredients in a medium bowl; toss to coat cucumber. Sprinkle with onions and peanuts before serving.

Yield: 6 servings (serving size: 1/2 cup salad, 1 teaspoon green onions, and 3/4 teaspoon peanuts)

 
Posted by Picasa

Friday, May 25, 2007

Ham and Manchego Panini with Dipping Sauce

Most of my cookbooks and cooking magazines are boxed up and ready to go into my storage space next week (and the following week...and the week after that...), but while sorting and packing them, I started flipping through a few issues of Everyday Food from 2005 and 2006. I came across a lot of yummy-looking and easy-to-make recipes that I missed the first time around. I came across this recipe for Ham and Manchego Panini with Dipping Sauce in the October, 2006 issue, and I knew that I had to try it. (This sandwich had me at dipping sauce.)

This is a really good sandwich. I liked the slightly salty, slightly sharp taste of the Manchego cheese. There were three different maturities of Manchego cheese at Whole Foods...3 months is the most mild, 6 months is more sharp, and 12 months is the sharpest. I bought the 6 months (middle-of-the-road) Manchego, and I would do so again. I also used Boar's Head Deluxe Ham. It would be really easy to adapt this sandwich with your favorite kind of bread, sliced meat and cheese. I really liked the dipping sauce with it. However, I'd like to make this again (sans dipping sauce) and add either some sliced dill pickles (for sourness) or rings of red onions (for zing and a slight crunch) to the sandwich. I think the taste of the sandwich could definitely be kicked up a notch (Emeril, anyone???) by adding either of these.

I ate this sandwich along with Cucumber Salad with Rice Vinegar Dressing from the current issue of Cooking Light. The recipe is here. I'll review the recipe and post a picture tomorrow. (Hint: It was a yummy, too!!!)

Ham and Manchego Panini with Dipping Sauce

Source: Everyday Food – October, 2006, p. 158

4 slices country bread
4 ounces thinly sliced ham
2 ounces Manchego cheese, coarsely grated (1/2 cup)
4 teaspoons olive oil
3 tablespoons apricot jam
1 tablespoon Dijon mustard

Top each of 2 bread slices with ham, Manchego, and remaining slices. Brush tops of panini with 2 teaspoons oil.

In a large nonstick skillet, heat remaining oil over medium-low. Place panini in skillet, oiled side up. Cover; cook until golden brown and cheese has melted, 5 to 8 minutes per side, pressing down with a spatula 3 to 4 times during cooking.

Meanwhile, make dipping sauce: In a small bowl, mix together jam and Dijon. Serve panini with sauce on the side.

Serves 2.

Before:


After:

 
Posted by Picasa

Happy 2nd Birthday, Laura Alexandra!!!

The most gorgeous redhead on the planet turns 2 today. Happy Birthday, LuLu the Beautiful!!! Auntie Mindy longs to see you and smother you with hugs and kisses, but since you’re across the pond (in Thames Ditton, Surrey), I’m virtually sending them to you instead. (Are you ready???)

XOXOXOXOXOXOXOXOXOXOXOXOXOXOXOXOXOXOXO

(Give my love to your mummy and daddy, too. I hope they do something fun with you over this Spring Bank Holiday weekend. Maybe your daddy should update your website, too…he’s about 18 months behind.)

Many, many more years of love, laughter and happiness to you!!!


Posted by Picasa

Thursday, May 24, 2007

Oatmeal Cookies

I know, I know. Oatmeal cookies don't have the "Wow!!!" appeal that so many other cookies do. In fact, the idea of oatmeal cookies seems a bit boring. However, these aren't just any plain ol' oatmeal cookies. These cookies are thick, toothsome and have the perfect texture. They aren't crunchy, they aren't chewy...they have that perfect "right-in-the-middle-of-crunchy-and-chewy" texture. (Hmmmm...is it the ground oatmeal or the light corn syrup that gives these that much sought-after perfect cookie texture?) The molasses taste from the dark brown sugar really adds a nice flavor, and the fact that these cookies are loaded with big chocolate chips and toasted pecans makes them a perfect 10. This is definitely not your mother's oatmeal cookie recipe. (My mother doesn't have an oatmeal cookies recipe, but maybe yours does.)

I got this recipe from this blog. They halved the original recipe. I halved and tweaked their recipe based on both the amounts of ingredients I had on hand and personal taste preferences.


Oatmeal Cookies

Recipe seen on Writing At The Kitchen Table blog
(Adapted from Carole Walter's Great Cookies)
Adapted, tweaked (and perfected???) by Me


2 1/2 tablespoons dark brown sugar
1 1/2 tablespoons granulated sugar
10 tablespoons old-fashioned oats, divided
¼ cup plus 2 tablespoons all-purpose flour
1/4 teaspoon salt
1/8 teaspoon baking powder
1/4 cup (4 tablespoons) unsalted butter, slightly softened
1/2 tablespoon light corn syrup
1 egg yolk
1/2 teaspoon vanilla extract
1/2 cup Guittard Semisweet Super Cookie Chips (or chocolate chunks)
1/3 cup chopped pecans, toasted and cooled

Preheat oven to 350 degrees F. Lightly grease a large cookie sheet.

In a food processor fitted with metal blade, process the brown and white sugars and 4 tablespoons of oats until sand-like. (This took about 2 minutes in my mini chopper).

Sift together flour, salt and baking powder. Stir in the remaining 6 tablespoons of oats. Set aside.

Using a hand mixer or stand mixer, blend the butter with corn syrup on low speed until light. Beat in the processed sugar/oats mixture in two additions. Add the egg yolk and vanilla extract; blend well.

Turning the speed up to medium, add the sifted flour in two additions, mixing until just combined. Fold in the chocolate chips and nuts.

Divide dough into 9 equal pieces and roll into balls or shape into mounds. Place balls/mounds on prepared cookie sheet, leaving about 2-3 inches between each ball/mound. (The cookies will spread slightly during baking).

Bake for 10-12 minutes or until cookies start to turn golden around the edges. Let cool for 2 minutes on cookie sheet then remove with a spatula to a wire rack to cool completely.

Makes 9 BIG cookies.


Mmmm...right from the oven. Gooey and delicious.

 
Posted by Picasa

Stupid Nice Pictures - Part 3

Bad hairdos (I would say "hairdon'ts", but that's seriously lame) were in abundance in Nice. These pictures were not altered in any way.

Hey, mom, hurry up and find a pen so I can get Carrot Top's autograph. "Oh, you're not Carrot Top? Sorry, mister."


Somebody needs to take a good, long hard look in the mirror.


If you think this is bad, you should have seen her outfit...complete with white lace anklets and gold jelly shoes.

 
Posted by Picasa

Stupid Nice Pictures - Part 2

Since I am a friend to cows and don't eat them, I didn't indulge myself in a Spider-Man Burger like so many others in Nice were. With marketing propaganda like this, though, who could resist one?


Pigeons sunbathing in a Nice park.


Hmmmm...I wonder why berets weren't selling at this hat shop???


Melvin, my constant travel companion (since being purchased in Vancouver in June 2005), is enjoying his bottle of water and practicing his French phrases while overlooking the Promenade.

 
Posted by Picasa

Stupid Nice Pictures - Part 1

I’m in a stupidly (is that a word???) bizarre mood today. Not sure what exactly my problem is. I think I just stopped stressing about this whole moving thing and realized, “Hey, my life is pretty darn good and it will all work itself out.” Anyway, I was looking through some of my France pictures today, and I thought I would post some of the stupid pictures I took in Nice. I will post some of the beautiful French Riviera pictures soon. (Stupid first, then splendid.) I still wake up thinking of the Riviera and the aquamarine Mediterranean every day. Oh, it was so beautiful there, and I can’t wait to go back. Soon!!!

Enjoy the pictures!!! I promise better ones will follow soon.

This picture was taken from our hotel balcony overlooking the Promenade. Not sure what this girl's issue was, but the police eventually came to pick her up off the ground.


This was one of the many (truly terrible) street performers who showed up every night along the street where the majority of the outdoor dining restaurants in Nice were. He would alternate singing in a man's and woman's voice and would turn his hat around whenever he would change his singing voice. I just cannot describe it. You'd have to go to Nice and see it for yourself. I was on a mission to find him every night before my mom and I had dinner just so I could get a laugh and be in a good mood the rest of the evening.


Weird, oversized creepy statue "thingy" outside pizza restaurant in the Old Town of Nice. There were two others creepy statue "thingies" nearby, too. Needless to say, we didn't eat there.


Tête Au Carré - The Square Head. This is the city library headquarters in Nice.

 
Posted by Picasa

Wednesday, May 23, 2007

Sad and Stressed

That's my boy Kurt today. Sad because his Red Wings suck (I mean, lost). Stressed because he's closing on his townhouse on Friday and driving/moving out to Arizona next week.

(Hey, Atlanta...where's everybody going???)

Since I was on a baking spree in the kitchen today, I figured, "Why not bake a batch of cookies for both Chris and Kurt?" (See the recipe for the cookies I baked for Chris in the previous post.)

(Sorry for all of the cookie recipes with chocolate chips, coconut and almonds recently. I didn't realize how much of these three ingredients I had in my pantry and need to use up before my move to Vancouver in five weeks. FIVE WEEKS!!! Yikes...and Yippee!!!)

Chocolate Chunk Oatmeal Coconut Cookies

Adapted from Epicurious - Gourmet, August 2001

2 sticks (1 cup) unsalted butter, softened
1 cup packed brown sugar
6 tablespoons granulated sugar
2 large eggs
1 1/2 teaspoons vanilla
1/2 teaspoon baking soda
1/2 teaspoon salt
1 cup all-purpose flour
2 1/4 cups old-fashioned oats
1 1/2 cups packaged finely shredded unsweetened coconut
2 cups semisweet chocolate chunks (I used chocolate chips)
3/4 cup almonds with skins, toasted, cooled, and chopped

Preheat oven to 375°F.

Beat together butter and sugars in a bowl with an electric mixer at high speed until fluffy. Add eggs and beat until just blended, then beat in vanilla, baking soda, and salt. Add flour and mix at low speed until just blended. Stir in oats, coconut, chocolate, and almonds.

Arrange 1/4-cup mounds of cookie dough about 3 inches apart on 2 lightly buttered large baking sheets (about 8 cookies per sheet), then gently pat down each mound to about 1/2 inch thick. Bake in upper and lower thirds of oven, switching position and rotating pans halfway through baking, until golden, 15 to 18 minutes total.

Cool cookies on sheets 1 minute, then transfer with a spatula to racks to cool completely. Make more cookies in same manner.

Makes about 24 large cookies.

 
Posted by Picasa

Chocolate Truffle Cookies

What do you do when you find this in your pantry?


You bake a batch of cookies, of course. (I'm still pondering when I actually bought these chocolate sprinkles. Hmmm...still pondering.) My neighbor Chris is moving back to India next week after a year here in the United States, and I wanted to bake him something to wish him a fond farewell. He's such a great guy, and I wish I would have spent more time getting to know him, but he promised to stay in touch, and I promised him that every batch of cookies I bake and blog are being "virtually" sent to him in Bombay.

All my best to you, Chris!!!


Chocolate Truffle Cookies

Source: Adapted from Taste of Home

½ cup plus 2 tablespoons unsalted butter, softened
1 cup plus 2 tablespoons confectioners' sugar
3 tablespoons natural cocoa powder
2 tablespoons sour cream
1 ½ teaspoons vanilla extract
1 cup plus 2 tablespoons all-purpose flour
1 cup (6 oz.) semisweet chocolate chips
3 tablespoons chocolate sprinkles

In a large mixing bowl, cream butter, confectioners' sugar and cocoa until light and fluffy. Beat in sour cream and vanilla extract. Add flour; mix well. Stir in chocolate chips. Refrigerate for 1 hour.

Roll into 1-in. balls; dip in chocolate sprinkles. Place, sprinkled side up, 2 in. apart on ungreased baking sheets. Bake at 325° for 10 minutes or until set. Cool 5 minutes before removing to a wire rack to cool completely.

Yields about 30 cookies.